Attaching an onboard camera on a Limitless RC car doesn’t have to be complicated. There are multiple FPV systems to choose with a variety of methods to install them.
FPVing a Limitless offers many compelling benefits. It empowers you to drive beyond the visual range, meaning you don’t need to be stuck in a small RC track but instead, you could expand your horizon by driving farther on larger spaces such as go-kart tracks or standard racing circuits. You also get to immerse yourself in a realistic experience of actually driving an RC car at breakneck speed.
Things You Need
An FPV system typically consists of three main components – the camera, the video transmitter, and the FPV goggles. Here is the list of parts you need to proceed with the specific items we shall use in this tutorial.
- FPV camera – RunCam Split 4
- Video transmitter – 5.8GHz RushFPV Max Solo 2.5W transmitter
- Video transmitter antenna – RushFPV RHCP circular antenna
- FPV goggles – HDZero FPV headset
- FPV goggles antenna – 5.8GHz Lumenier AXII ultra-long range RHCP circular and patch antenna
- Soldering iron and solder
- Heat shrink tubes – to be used with soldered wires
- Battery connector – typically a JST connector that matches your LiPo balance lead
- Double-sided tape or hot glue
Below are some parts that are optional but recommended.
- 3D-printed mounts – to mount the video transmitter and camera
- Multiple standoff screws – to secure the video transmitter and camera circuit board
- Electric drill with 3mm and/or 4mm drill bits, or a craft knife
- Hand file – to enlarge holes after drilling.
- Cable ties
Choosing an FPV System for RC Car – Analog or Digital
The biggest dilemma you may have when planning to FPV your Limitless is selecting between an analog or digital FPV system. To keep things quick and simple, below is a comparison between the two systems.
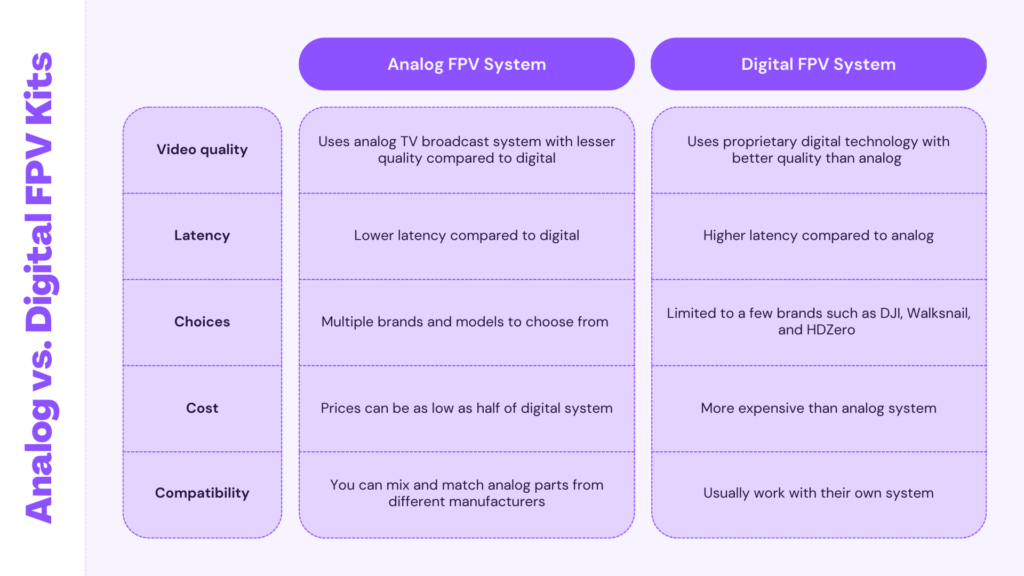
The most compelling difference is the cost. If you have a bigger budget, you can go for a digital FPV system. Otherwise, analog is the best system forward. The price difference is about half and this depends on the brands and quality of parts you choose. The more you pay usually means the more you get in quality.
Digital systems do offer resolutions from HD to 4k. This is the quality you often see in drone cinematic video footage. Analog systems, on the other hand, offer video quality that is similar to traditional terrestrial TV systems. However, some analog FPV cameras do include a digital video recorder (DVR) that records its video feed up to 4k resolution. They also include a video stabilization feature. Some of these notable cameras are Hawkeye Thumb 4K and RunCam Split 4 which we shall use in this tutorial.
Video stabilization feature such as Gyroflow only works with digital video. Analog video doesn’t suffer immensely from vibration but it’s always best to achieve a vibration-free video feed.
Another difference between analog and digital systems is video latency – the delay you experience in the video transmission between the video transmitter on your RC and your goggles. What you see is not what your Limitless is doing during this delay. This latency is usually under 30ms for analog and above 30ms or more for digital. However, some digital system manufacturers claim they can go below this amount. This tiny fraction of a second may not seem insignificant but they do make a difference when your RC vehicle is traveling at speeds above 100km/h (0.6mph). That is why the Drone Racing League (DRL) uses analog FPV systems. We do recommend an analog system for racing because it offers lesser latency.
Another thing to note is that digital systems usually only work with their own devices – something like the Apple system. This means you must use a DJI video system with a DJI headset. They are not cross-compatible with other digital devices from other manufacturers. However, some digital goggles like HDZero can support other digital systems such as the Walksnail Avatar system.
To begin with FPV, it’s always good to start with an analog system and this will be the focus of our tutorial.
Choosing FPV Camera
You will be extremely spoilt for choices when it comes to FPV analog cameras. To narrow things down, below is a list of some notable series.
- Runcam Eagle – known for its wide dynamic range (WDR) and low latency, usually used for racing drones.
- Runcam Swift – a compact camera with great image quality, often used in racing drones.
- Runcam Phoenix 2 – offers excellent image clarity and color performance.
- Foxeer Predator – offers ultra-low latency and superior image quality with WDR technology.
- Foxeer Falkor – known for its high-definition image and customizable settings.
- Foxeer Razer – provides a balance between performance and affordability.
- Caddx Ratel – known for its excellent low-light performance and vibrant colors.
- Caddx Turbo Micro F2 – offers great image quality in a small form factor.
- Caddx Ant – known for its lightweight and small size.
These FPV cameras mainly differ based on video quality, size and cost. The choice is up to you and you may do your research based on the countless reviews on YouTube.
Since size isn’t a major factor for RC surface vehicles, you may also consider action cameras with better features like digital video recording with video stabilization. However, some do not include FPV capability meaning they don’t include a video out port (a.k.a TV-out) that sends the video signal to a video transmitter. Below, we shortlisted a few that offer this feature.
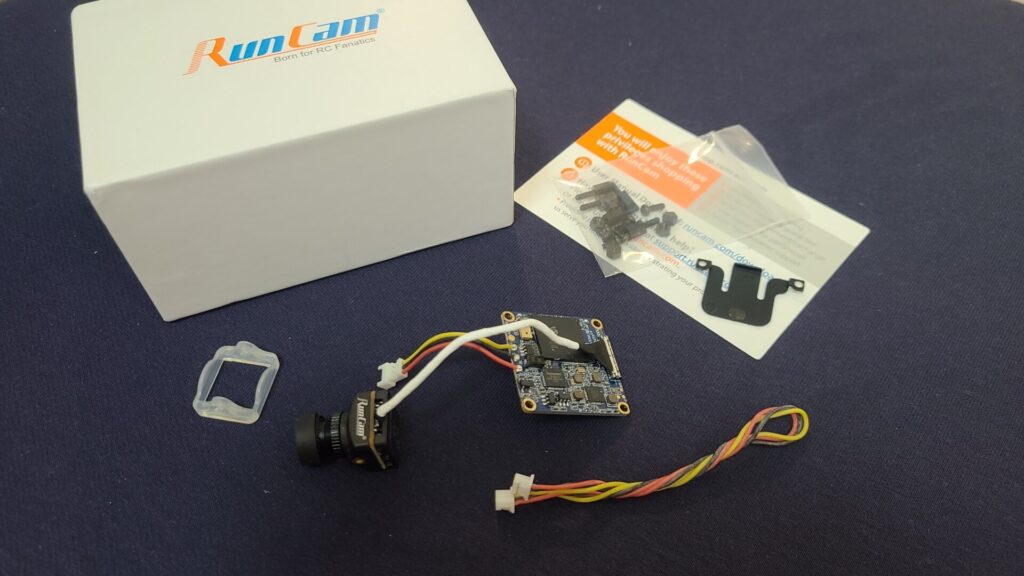
- RunCam Split 4 – supports up to 4k resolution DVR recording and Gyroflow video stabilization. Comes in two units – the camera and a circuit board.
- Hawkeye Thumb 4k – similar to RunCam Split in its features but comes in one solid plastic housing.
- RunCam Orange 5 – a typical 4k action camera with a TV-out port to connect to a video transmitter. Specialized cable is required.
You may also choose to use a low-cost FPV camera with a built-in transmitter such as the Eachine TX06, but don’t expect good video quality or long-range transmission. In this tutorial, we shall be using the RunCam Split 4 camera.
Choosing FPV Video Transmitter
Analog FPV systems generally work within the 5.8GHz frequency range. This is the electromagnetic spectrum used by the video transmitter to broadcast its signal to the FPV goggles. This frequency is separated into different bands – Band A, B, C and so on. Each band is further divided into channels – Channel 1, 2 and more.
You can virtually mix and match any analog parts from any manufacturer as long as they work within the same standard 5.8GHz frequency which they usually do. This means you can use an FPV camera from RunCam with the RushFPV Max Solo video transmitter and with a variety of FPV goggles such as those from Fat Shark, Eachine, Skyzone, and even HDZero (with an analog expansion module).
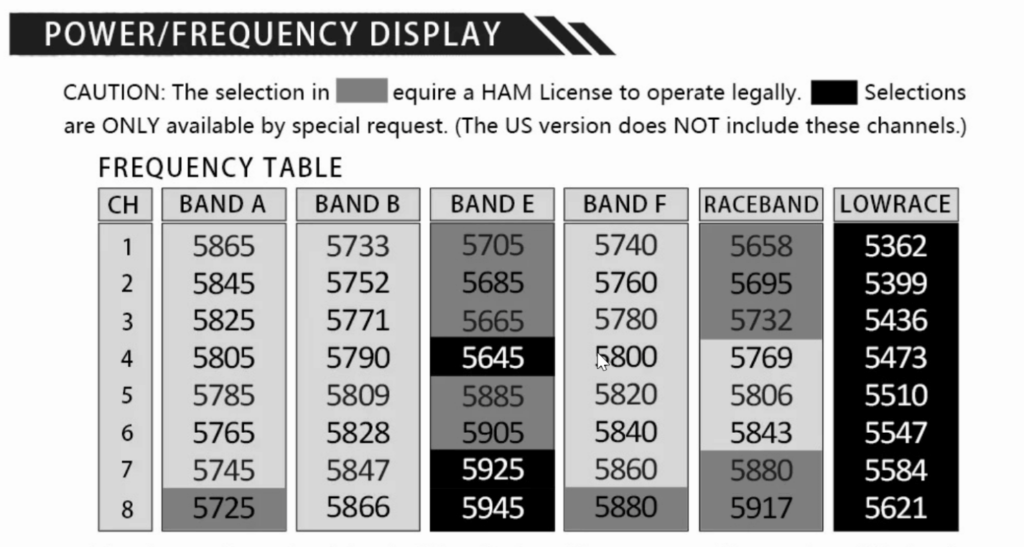
Some analog video transmitters and FPV headsets also support the race band which is a designated group of frequencies within the 5.8 GHz band to provide clear separation between video transmission channels. It consists of 8 channels spaced 37 MHz apart, which reduces the chances of cross-channel interference that can cause video feed issues during races.
In the context of the FPV system for RC cars, we want to select a transmitter that provides long-range video transmission. Unlike drones which fly high up in the air, RC surface vehicles tend to suffer more from multipath propagation when transmitting video signals from the ground. This is compounded by the difficulty in maintaining a complete line of sight where multiple ground objects, like trees or buildings, can block the signal.
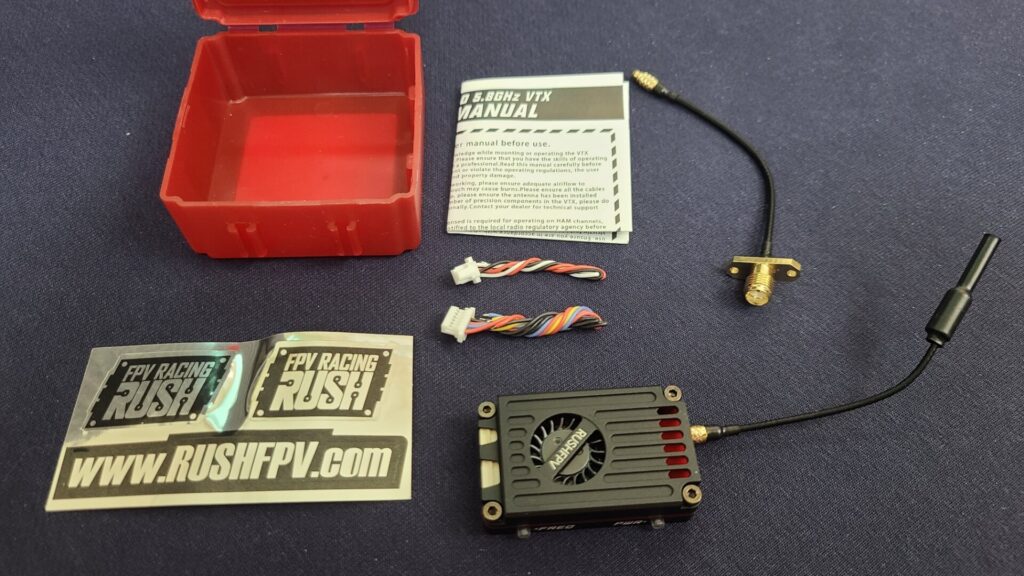
Therefore, we should be using a video transmitter that offers high-wattage video output. Anything from 2W and above is highly recommended as this high power output will fuel its long-range capability. You may choose from any generic video transmitter that could fit inside a Limitless RC car. However, we do recommend the RushFPV Max Solo 2.5W video transmitter. It has a small form factor (40 x 24 x 10.5 mm) and is lightweight enough (15 grams, without cable) to be placed inside many RC vehicles. We shall use this transmitter in this tutorial.
Choosing FPV Goggles
Considering our focus on analog FPV systems, there are multiple FPV headsets to choose from ranging from budget goggles costing $100 and above to $600 high-end headsets that support both analog and digital systems. Virtually all of them support 5.8GHz frequency and their prices usually vary based on the main specifications below.
- Screen type – box or binocular
- Screen size and resolution
- Built-in digital video recorder
- Support for digital systems
The most recommended box goggles would be the Eachine EV800D which is priced around $100. It is a box headset, meaning it comes with a single LED screen TV mounted inside instead of the binocular type which has two screens, similar to Meta Quest VR goggles.
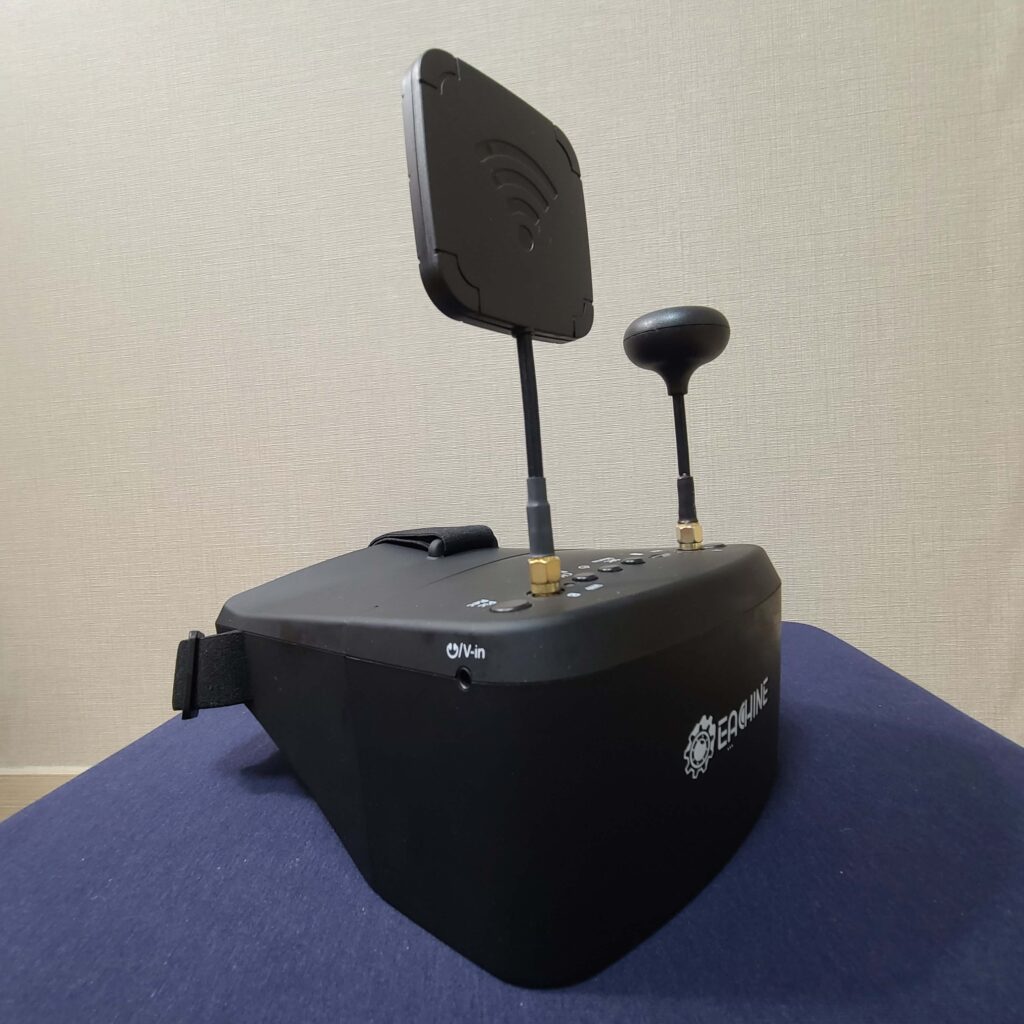
The screen resolution is 800 x 480 with a 5-inch size. With its affordable price, it comes with a built-in battery and two antennas – circular and patch antenna. It is heavier (362 grams without antennas) and bulkier than other binocular goggles but thanks to its lower price, it is still popularly used. It has a built-in digital video recorder to record your FPV footage to a micro SD card.
Only Eachine EV800D variant with a “D” includes a digital video recorder. The EV800 model without the “D” does not have one.
The other great feature of this headset is its support for diversity technology which allows the device to automatically switch between its two antennas to receive the best signal. We highly recommend this FPV headset for your first pair of goggles.
Watch out for fake EV800D units in the market. They do not come with diversity and is priced much lower than the recommended retail price.
If you have a higher budget, you can consider analog binocular goggles such as those from Fat Shark, and Skyzone. They cost more than box-type goggles but have a smaller form factor and are lighter, thus, allowing them to sit comfortably on your forehead compared to box goggles – a major importance especially when both of your hands are tied to holding your RC car and transmitter.
Most of these models include digital video recorders and good screen resolution. Some may not include a built-in battery so you need to use your existing LiPo battery as the power source. Some also do not come with an analog receiver module – the circuitry that enables your goggles to pick up the video signal from the video transmitter. The two most common analog receiver modules that you can purchase separately are the ImmersionRC rapidFIRE and TBS Fusion. Both are compatible with most Fat Shark Dominator and Attitude (V3 and V4) goggles. You may also need to purchase separate antennas since some are not included in the box.
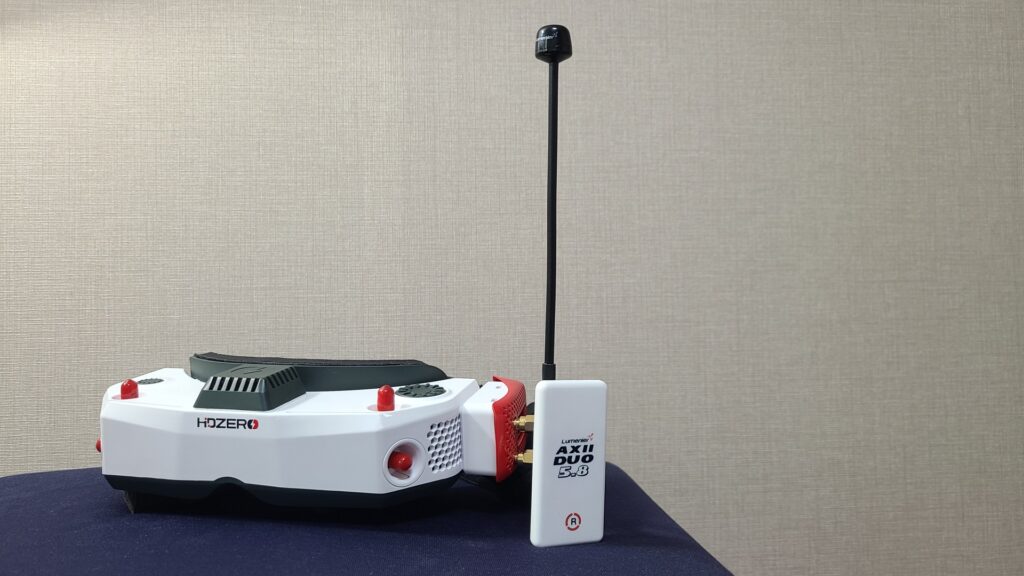
If you’re looking for a pair of FPV goggles that support analog and digital systems, look no further than the HDZero goggles. It has a hefty price tag of about $600 but its versatility could be worth it. This binocular-type headset boasts all the must-have features for FPV goggles while supporting its own HDZero digital system and others such as Walksnail Avatar HD system, or via simple HDMI input. For analog, it is compatible with ImmersionRC rapidFIRE and TBS Fusion receiver modules. However, you still need to get your own battery and antennas. It claims to have a latency of under 3ms.
Choosing Antennas
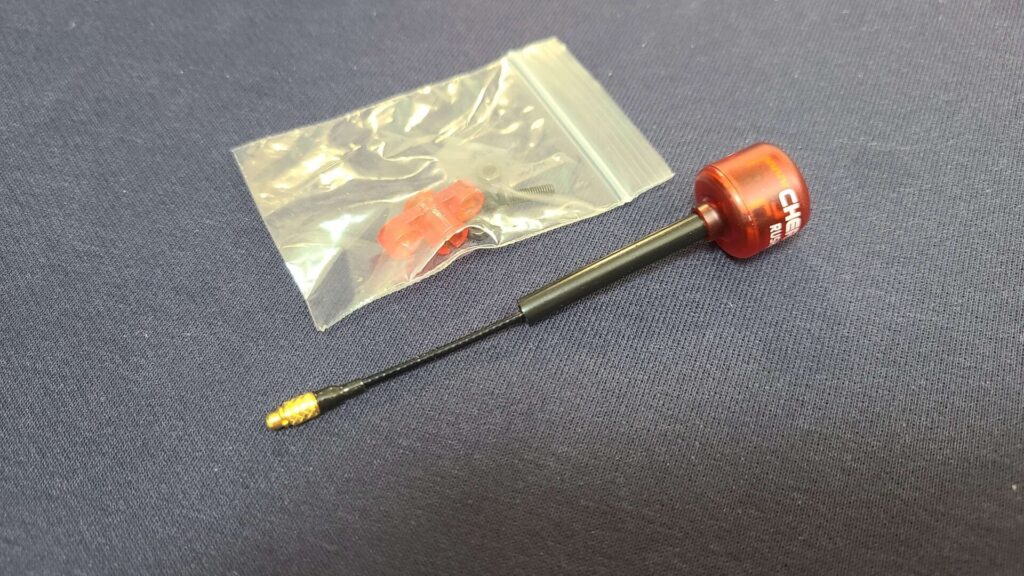
In general, there are three types of antennas for FPV – linear, circular and patch antennas. A linear antenna looks like a straight pole and is better suited for stationary objects. A circular antenna, also nicknamed clover, mushroom, or leaf antenna, looks like what its name suggests and is best for moving objects like an RC car. A circular antenna is subdivided into two types – RHCP (Right-Hand Circular Polarized) and LHCP (Left-Hand Circular Polarized). Here’s a good article explaining the difference between the two.
When using circular antennas, you’re encouraged to use the same polarization for your video transmitter and FPV goggles – RHCP on your transmitter with RHCP on your goggles, LHCP with LHCP.
A patch antenna which looks like a flat plate is used on the FPV goggles and not on your RC vehicle. It is a highly directional antenna that is used to pick up the video signal from the RC car. Ensure that the front side of this antenna is facing your RC car during operation.
In total, you need at least two antennas – one for the video transmitter and another for your FPV headset, but for better video reception, you should add a patch antenna. We recommend having three antennas – a circular antenna for your transmitter with a circular and patch antenna on your FPV goggles.
Wiring an FPV System
There are three components that you need to connect together – the FPV camera, the video transmitter, and the LiPo battery which provides the power source. Below is a standard wiring diagram for most analog FPV systems.
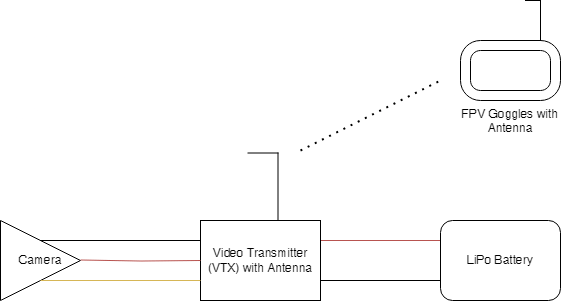
Each FPV camera and video transmitter must have a power source that is usually 5V and above. You may tap this power source from the Limitless LiPo battery’s balance lead. Some video transmitters, such as the RushFPV Max Solo we are using, provide a 5V voltage output (called BEC for Battery Elimination Circuit) and we may use this output to power the camera.
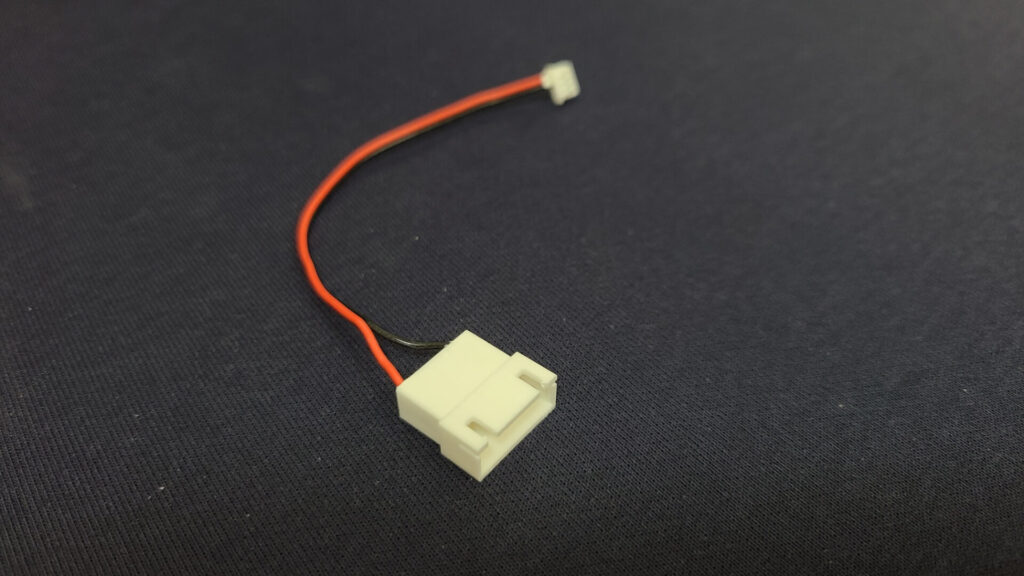
Most FPV cameras and transmitters come with their JST connectors but sometimes they leave the other end open. This means we need to get our own JST connector that matches the LiPo balance lead and solder this connector to that end.
JST (Japan Solderless Terminal) connectors are the standard electrical connectors used in RC and FPV systems. However, they come in a variety of shapes and sizes.
Make sure that you use JST connectors that match the other end that you wish to connect. Pay attention to the pitch – the distance between two pins.
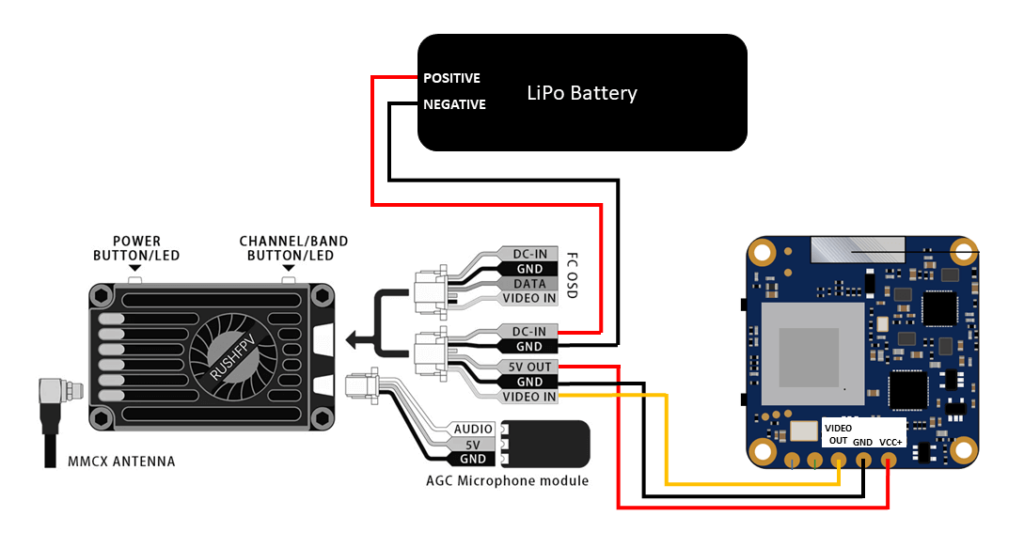
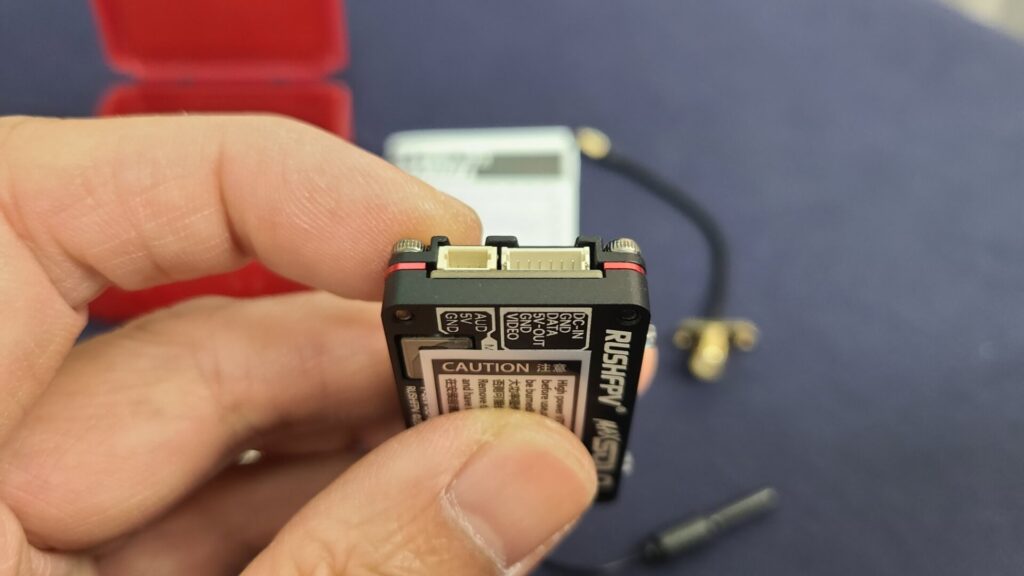
Based on the connection diagram above, we need to solder the positive terminal (red) of the LiPo battery to the DC-IN port and the negative terminal (black) to the GND. Then, we shall solder the 5V OUT terminal wire to the VCC+ of RunCam Split 4 and the other GND wire to RunCam Split GND respectively. For the video signal, we shall connect the VIDEO OUT of RunCam Split to the VIDEO IN of Max Solo. We should apply heat shrink after soldering.
We shall also solder a JST connector that is compatible with the LiPo balance connector to the video transmitter’s power wires. These lines are usually red (positive) and black (ground). The JST connector for a LiPo balance port is generally female so you need to get the male.
Remember to solder the two most ends of the wires to the LiPo battery JST connector to obtain sufficient voltage to power the video transmitter.
To power on the system, connect the LiPo balance port to the transmitter’s JST power connector that we just soldered. You may now put it on the FPV goggles and switch it on. Perform a band scan, also known as a frequency scan. The headset should be able to pick up the video signal from the transmitter.
Before powering on, make sure you solder positive voltage wire to positive terminal and negative wire to negative terminal. Don’t forget to attach the antenna to the transmitter before powering up.
Mounting the FPV Camera and Video Transmitter – Without Drilling Holes
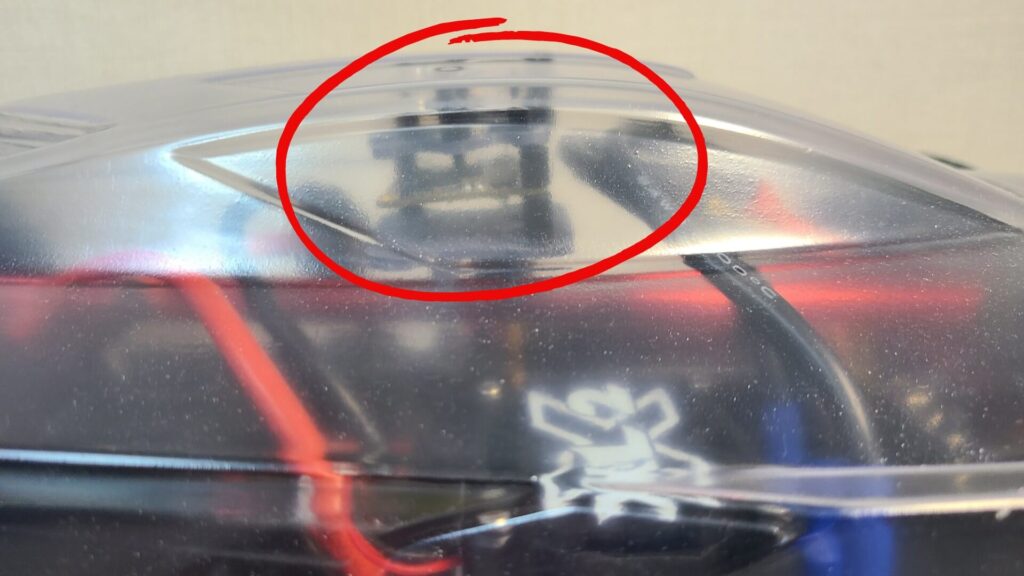
Due to the limited space inside an Arrma Limitless chassis, the most ideal place to mount the video transmitter is on the inner side of the body shell, as shown below. You may also consider placing the transmitter on top of the receiver box.
The FPV camera should be located on the outside. One option is to place the camera on top of the windshield and the other option is to place it on top of the nose, as shown below. We may attach the camera with double-sided tape or hot glue. Ensure the camera wires are long enough to reach the video transmitter inside the cover.
The RushFPV video transmitter does not come with mounting holes. Nonetheless, we can secure it underneath the body with double-sided tape or hot glue, thanks to its 15 grams in weight.
We then attach the antenna to the transmitter and fix it with duct tape below the shell. The antenna can still transmit video signals while being inside the body cover without being perpendicular to the ground.
Mounting the FPV Camera and Video Transmitter – By Drilling Holes
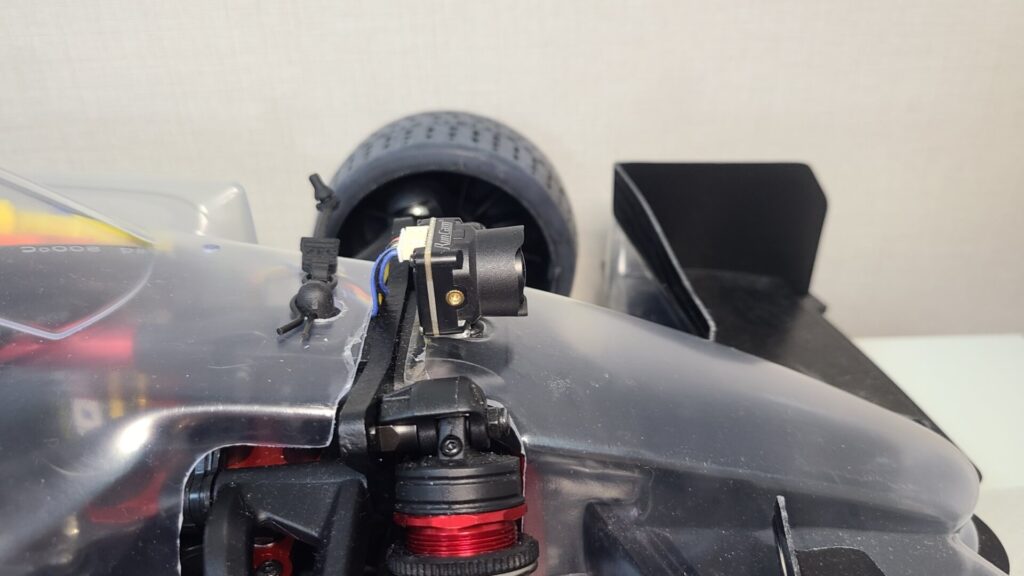
This is a more secure option and it involves drilling holes in the body cover. We shall mount the FPV system underneath the cover while the camera shall be on top of the windscreen, as shown below. This allows for a higher view of the front.
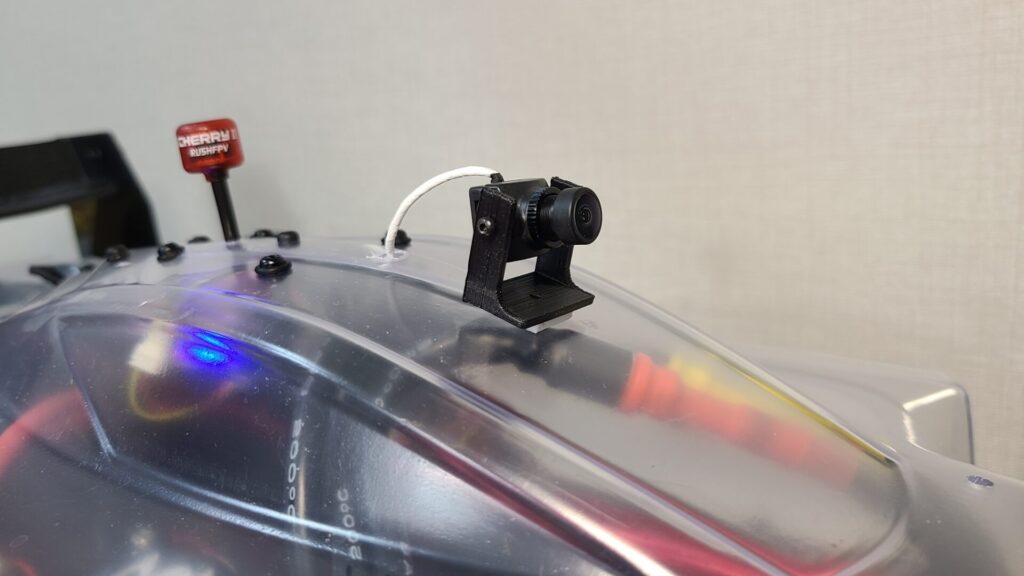
We shall use a 3D-printed bracket with four M3 (3mm) holes to secure the Max Solo video transmitter with four standoff screws. The holes are 30mm apart. This mounting bracket should be printed with low infill to let it sufficiently flex when inserting the transmitter.
Because we use RunCam Split 4 in this tutorial, we must add another 3D-printed piece to hold the camera’s circuit board. This PCB board has a distance of 25.5mm between its mounting holes. Hence, we need a plate with at least a 25mm distance to fit in with the 3D-printed transmitter bracket. The result after securing both mounts with standoff screws is depicted below with the transmitter and circuit board on top of one another. We shall also add anti-vibration rings around the screws to reduce any vibration.
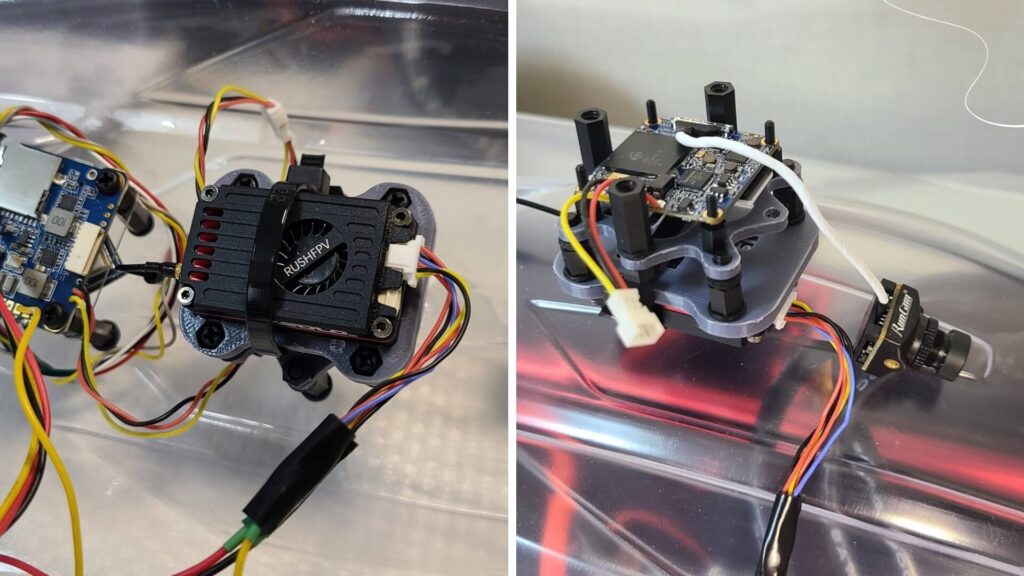
We use black standoff screws with 6mm in height for the screws between the transmitter bracket and the PCB board mount, and 12mm for the ones to be secured to the body shell. RunCam Split does come with tiny standoff screws which we use between the board and the printed mount below it.
From the photo above, notice that we are using only three standoffs to hold the camera circuit board. We choose not to use the fourth screw in front because it will block access to the micro SD card that stores the recorded videos. The SD card slot should be facing the front of the car for easy access. So, in total, we need to drill five holes.
- Three 3mm screw holes for camera circuit board standoff screws
- One hole for the camera cable, big enough to insert the cable through
- One 4mm hole for the antenna
If you don’t own an electric drill, you may consider using a craft knife by carefully drilling it perpendicularly to the shell. It will take some effort but the polycarbonate shell is not too tough for the knife to drill through.
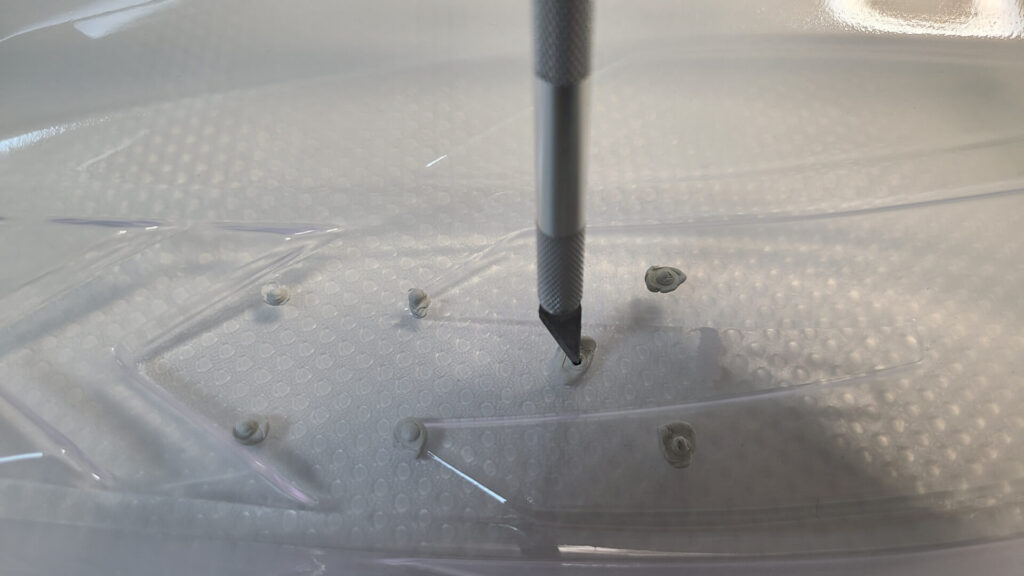
You may need to use a cylindrical hand file to enlarge the camera wire hole so that the cable can easily pass through. This rat tail hand file is also useful to enlarge the hole for the antenna to 4mm, if you only own a 3mm drill bit.
Once we have drilled all the holes, we shall insert the camera cable through the hole and attach the cable to the RunCam Split circuit board. The camera should now be outside the shell and the wire on the inside. Then, attach the camera to the camera mount (optional) and apply double-sided tape below it. Secure the camera on top of the body shell, preferably near the top of the windshield.

Next, attach the camera cable to the camera circuit board and secure the entire unit underneath the body shell with screws for the standoffs. Lastly, insert the antenna through the antenna hole and connect it to the transmitter.
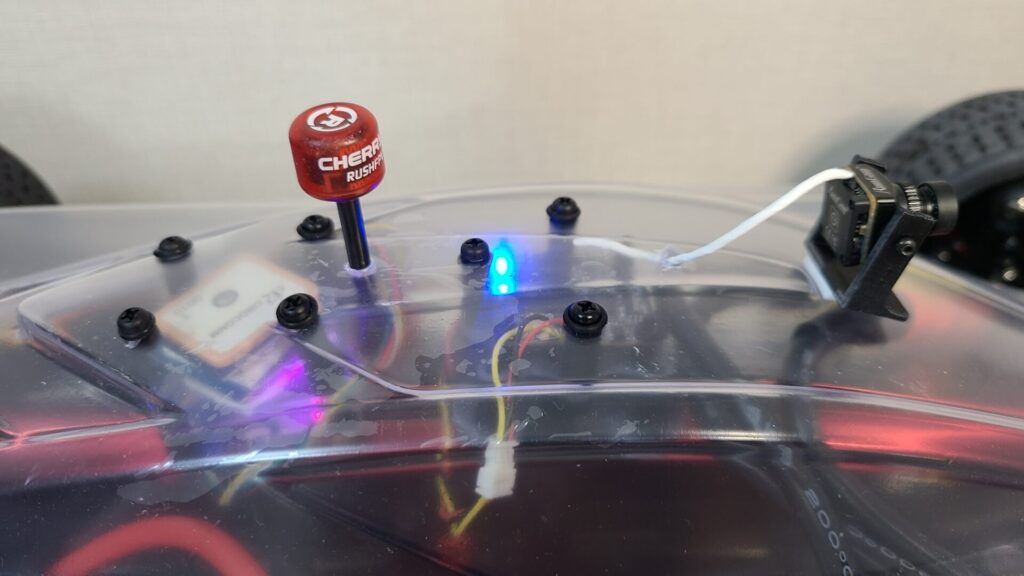
Final Result
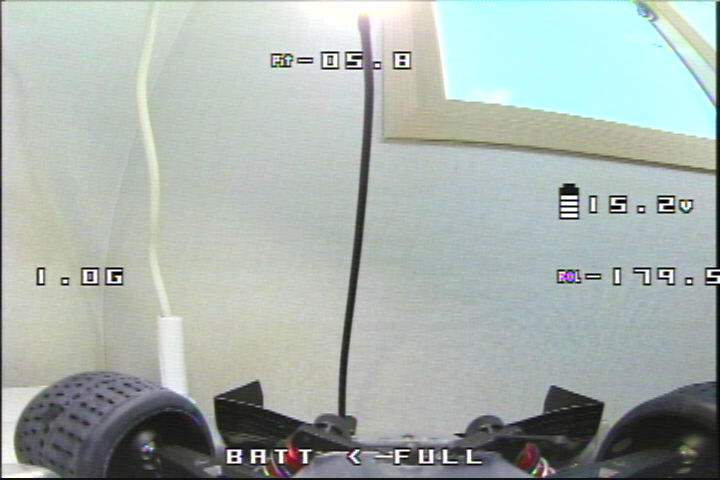
Once you have done all the above, you should have something as shown below. Now you can switch on your Limitless with its brand new FPV kit and put on your FPV goggles to experience a new realism in RC driving. If you need further help to install an FPV system on Arrma Limitless, contact us for free assistance.
If you’re an owner of Arrma Limitless, join us to get a chance to be a world champion in Formula RC.